
Welcome to part 4 of managing Microsoft Teams room devices within Intune.
A shoutout to my colleague and good friend Steven Hosking (@OnPremCloudGuy) for his help with Autopilot below!
Be sure to check out the series of posts:
Managing a Microsoft Teams Room (MTR) Device with Intune – Part 1 – Theme
Managing a Microsoft Teams Room (MTR) Device with Intune – Part 2 – Updates
Managing a Microsoft Teams Room (MTR) Device with Intune – Part 3 – Configuration Profiles
Managing a Microsoft Teams Room (MTR) Device with Intune – Part 4 – Autopilot
What is Autopilot?
Windows Autopilot is a way of automating the OOBE (Out of Box Experience) when setting up a new Windows device. Without autopilot, you’d typically need to enter the language, keyboard input, user account details, Azure AD Join, Networking and Wi-Fi details and more. Autopilot can automate all these steps so that all you need to do is power on the device, and allow it to sign in.
Is Autopilot supported today with MTRs?
In short, no Autopilot is not officially supported by Microsoft for MTRs yet. However, based on my testing, autopilot does work for MTRs.
What can I configure on an MTR with Autopilot?
You can automate the following (and more!):
- Language and keyboard settings
- Azure AD Join
- Device naming (including automatically naming the device based on its serial number, or a random string of numbers)
- Networking and Wi-Fi details (no authenticated proxies though – MTRs do not support authenticated proxy servers).
- Any setup PowerShell scripts/configuration profiles including device wallpaper, Bitlocker requirements etc.
What doesn’t currently work with Autopilot on an MTR?
Today, you can’t configure the login username and password for the room inside the Teams room app on the MTR. This would still need to be manually entered by the MTR installer.
Configuring Autopilot Profile
Let’s go ahead and set Autopilot up for our MTR.
- Login to the Intune portal at https://manage.microsoft.com
- Go to Devices > Windows > Windows Enrollment > Deployment Profiles
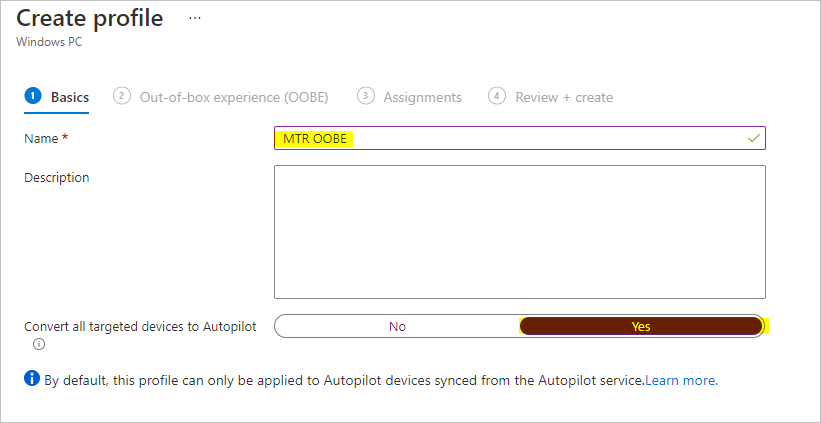
- Click Create Profile > Windows PC

- Give your profile a name, and be sure to select Yes under Convert all targeted devices to Autopilot
- Under Out of box experience (OOBE), select the following:

Under Enter a name, you can use the %SERIAL% macro to add the device serial number to the computer name, or %RAND:5% to add 5 random numbers to the computer name. In my example, i’ve added MTR-%SERIAL% meaning my MTR device will be named MTR-119872130 (if the serial number of my device is 119872130) - Be sure to assign the profile to your MTR Devices group, and click Create to create the profile.
Add MTR devices to Autopilot List
Now that our profile is configured, let’s add our MTR to our list of Windows autopilot devices
We’re going to need to grab the device hash of our MTR device to import it into the Azure portal.
Note: Some manufacturers will supply you with a CSV file containing the device hashes that you can import into the Azure portal.
There’s two ways to do this.
If you already have an MTR up and running:
Run the following in PowerShell on the MTR
- New-Item -Type Directory -Path “C:\HWID”
- Set-Location -Path “C:\HWID”
- Set-ExecutionPolicy -Scope Process -ExecutionPolicy RemoteSigned
- Install-Script -Name Get-WindowsAutoPilotInfo
- Get-WindowsAutoPilotInfo -OutputFile AutoPilotHWID.csv
If you have a new MTR fresh out the box:
Power on the MTR and launch the OOBE. Press Shift+F10 to open the Powershell window over the top of the OOBE, then run the following:
- Set-ExecutionPolicy bypass
- Install-Script Get-WindowsAutoPilotInfo
- (be sure to select Y for each prompt that appears).
- Get-WindowsAutoPoilotInfo -online
Once you have ran one of the above two options:
- Go to Devices > Windows > Windows Enrollment > Devices
If you used the first method that generates the AutoPilotHWID.csv file, you can import this file using the Import button.
If you used the fresh MTR out of the box method, you’ll see the MTR’s serial number listed (normally within 10 or so minutes).
The Autopilot Experience on the MTR
Once you have configured Autopilot and added your devices to the list, ensure your MTR is connected to the network via an Ethernet cable (This won’t work over Wi-Fi!), boot your MTR and allow it to go through the Out of Box Experience (OOBE).

Your MTR should automatically boot into the local Skype profile and prompt you for the Office 365 room account details. Depending on what configuration profiles and PowerShell scripts you’ve assigned to your MTR devices group, your device should also have applied custom wallpaper, an updated local admin password, Bitlocker enabled, Wi-fi details etc. It will also be automatically joined to Azure Active Directory and be renamed using your Autopilot device name settings.
Final Thoughts
And there you have it! A way of simplifying the out of box experience for your MTR devices to make the installation even simpler.
Feel free to leave your comments/questions below.
Be sure to check out the series of posts:
Managing a Microsoft Teams Room (MTR) Device with Intune – Part 1 – Theme
Managing a Microsoft Teams Room (MTR) Device with Intune – Part 2 – Updates
Managing a Microsoft Teams Room (MTR) Device with Intune – Part 3 – Configuration Profiles
Managing a Microsoft Teams Room (MTR) Device with Intune – Part 4 – Autopilot