Our advice has always been to ensure your Teams Meeting Room account passwords never expire. If however your org won’t allow you to set a non-expiring password for meeting room accounts, once the account password for your Teams meeting room devices expire the room will sign out and become inoperable.
Why disabling password expiration is always preferred
We recommend customers disable password expiration (and MFA!) for meeting room devices to prevent outages from occurring due to expired passwords. MFA is a slightly different story, and is more to do with the way authentication works on MTRs today. As the MTR authenticates multiple times a day, an MFA prompt would cause the room to fail to sign in and .. you guessed it, become inoperable. Exactly what we don’t want!
Dealing with expiring passwords
If your hands are tied though, and you must set expiring passwords on your Teams meeting room accounts, there’s two ways you can handle updating the passwords on your devices to ensure they don’t fall offline.
Option 1: Manually Update the Passwords on each Windows and Android MTR
Option 1 is basic, but will work for you if you have a small fleet of MTRs within easy reach (e.g the same building that you work in).
It involves going into Azure AD, updating the password for the account, and then going to each MTR, opening the admin settings and entering the new password.
Of course, you could use remote tools like TeamViewer to remote into the machine to achieve this too. RDP won’t work though, as you can’t sign in as the local Skype user to update the password.
Option 2: Use Intune (or similar) to push SkypeSettings.XML to your Windows MTRs
If you don’t already use Intune to push SkypeSettings.XML to your MTRs, you’re missing out on being able to control every aspect of your Windows-based Meeting room devices remotely!
We document exactly what parameters can be set within SkypeSettings.XML, including things like enabling/disabling bluetooth beaconing, Enabling third party meeting support for Zoom and CISCO, and you guessed it – Updating the username and password too!
Now, i’ve blogged about setting up your environment ready to support pushing out SkypeSettings.XML files before. If you haven’t read through this series yet, start there first as you’ll need to configure a few bits and pieces within Intune and Azure to ready your environment to support it.
Back already? Awesome. Let’s get to it:
First, decide upon if each of your rooms will use the same password, or a different password for each room.
Updating All Windows-based MTRs with the same password
Using the same password for each room is MUCH simpler, as it means you only need to create one SkypeSettings.XML file which you will then push to every Windows MTR in your environment.
To do this, open your SkypeSettings.XML file and add the following:
<SkypeSettings>
    <UserAccount>
    <Password>Password!</Password>
  </UserAccount>
Once done, save the file and wait for the MTR to re-check in with Intune and download the updated SkypeSettings.XML file which will be placed here on each Windows-based MTR: C:\Users\Skype\AppData\Local\Packages\Microsoft.SkypeRoomSystem_8wekyb3d8bbwe\LocalState\
Then, once the MTR reboots, it’ll pick up the new SkypeSettings.XML file, update the password and sign in using the new account details.
Using a different password for each Windows-based MTR
If you’d prefer to use a different password for each Windows-based Room, the steps are similar, but you’ll need to create a SkypeSettings.XML file for each of your rooms, and then target that specific room account when deploying the file within Intune.
Example:
Room 1:
<SkypeSettings>
    <UserAccount>
    <SkypeSignInAddress>MTRRoom1@microsoft.com</SkypeSignInAddress>
    <ExchangeAddress>MTRRoom1@microsoft.com</ExchangeAddress>
    <DomainUsername>domain\MTRRoom1</DomainUsername>
    <Password>Password!</Password>
    <ConfigureDomain>domain1, domain2</ConfigureDomain>
    <ModernAuthEnabled>true</ModernAuthEnabled>
  </UserAccount>
Room 2:
<SkypeSettings>
    <UserAccount>
    <SkypeSignInAddress>MTRRoom2@microsoft.com</SkypeSignInAddress>
    <ExchangeAddress>MTRRoom2@microsoft.com</ExchangeAddress>
    <DomainUsername>domain\MTRRoom2</DomainUsername>
    <Password>Password!</Password>
    <ConfigureDomain>domain1, domain2</ConfigureDomain>
    <ModernAuthEnabled>true</ModernAuthEnabled>
  </UserAccount>
You’d then create a PowerShell script to drop that file onto the specific Room by creating an Azure AD Group containing the rooms user account.
Example:
Room 1 PS1 script:
Invoke-WebRequest -Uri "https://chifferscommtrfiles.z8.web.core.windows.net/SkypeSettingsRoom1.xml" -OutFile "C:\Users\Skype\AppData\Local\Packages\Microsoft.SkypeRoomSystem_8wekyb3d8bbwe\LocalState\SkypeSettings.xml"Room 2 PS1 Script:
Invoke-WebRequest -Uri "https://chifferscommtrfiles.z8.web.core.windows.net/SkypeSettingsRoom2.xml" -OutFile "C:\Users\Skype\AppData\Local\Packages\Microsoft.SkypeRoomSystem_8wekyb3d8bbwe\LocalState\SkypeSettings.xml"
Automating Passwords
We can even use PowerShell to do something clever, like grabbing the serial number of the device and setting the password to that for each machine:
$SerialNumber = (Get-WmiObject -class win32_bios).SerialNumber
$MTRSerial = "$SerialNumber"
New-Item c:\temp\SkypeSettings.xml -ItemType File -Force
Add-Content c:\temp\SkypeSettings.XML "<SkypeSettings>"
add-Content c:\temp\SkypeSettings.XML " <UserAccount>"
Add-Content c:\temp\SkypeSettings.XML "  <SkypeSignInAddress>username@microsoft.com</SkypeSignInAddress>"
Add-Content c:\temp\SkypeSettings.XML "  <ExchangeAddress>username@microsoft.com</ExchangeAddress>"
Add-Content c:\temp\SkypeSettings.XML "  <DomainUsername>domain\username</DomainUsername>"
Add-Content c:\temp\SkypeSettings.XML "  <Password>Password!+$MTRSerial</Password>"
Add-Content c:\temp\SkypeSettings.XML "  <ConfigureDomain>domain1, domain2</ConfigureDomain>"
Add-Content c:\temp\SkypeSettings.XML "  <ModernAuthEnabled>true</ModernAuthEnabled>"
Add-Content c:\temp\SkypeSettings.XML " </UserAccount>"
Add-Content c:\temp\SkypeSettings.XML "</SkypeSettings>"
Move-Item -Path c:\temp\SkypeSettings.xml -Destination "C:\Users\Skype\AppData\Local\Packages\Microsoft.SkypeRoomSystem_8wekyb3d8bbwe\LocalState\SkypeSettings.XML"
You’d save the above script as a .ps1 file, and then run it as a script against each of your MTRs in Intune.
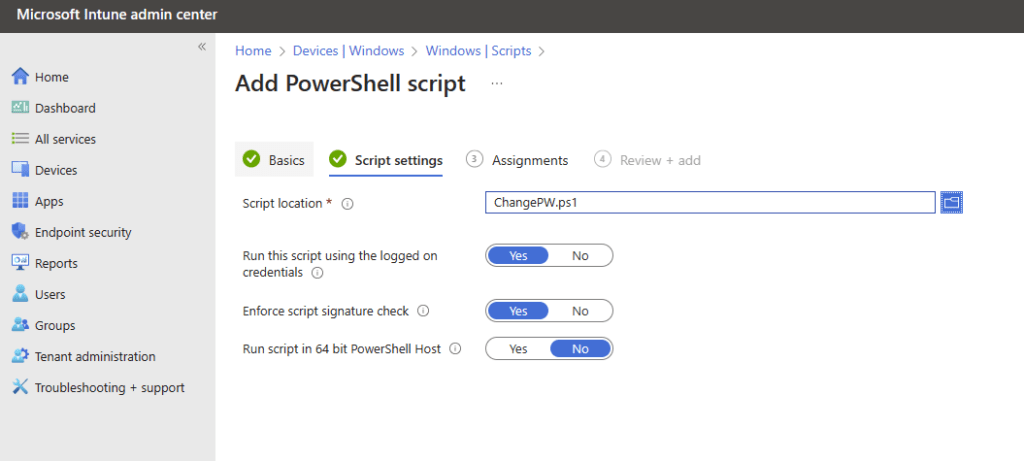
Of course, you’d want a copy of each serial number first to be able to set the correct password in Azure AD for each room – which you could of course script in PowerShell too!
Final Thoughts
How are you managing password expiration today with your rooms? Leave a comment below!
